It’s important to prioritize high-impact prevention strategies, as outlined in the Toolkit. Follow these steps to prioritize opportunities for improvement.
- Firm up your Implementation Team Leader, Core Team, Fall Team, and fall champions for the initiative. Make sure they are all involved or represented in the prioritization process.
- Look at each idea on the brainstormed list and start to group them into categories (affinity grouping). You can use whatever categories seem to make the most sense for your group. When you review the list, categories might start to jump out at you. They might include ideas such as universal fall precautions, fall risk screening assessment, care planning, post-fall practices, education, and metrics. Alternatively, you might decide to group ideas under the major categories in the fall clinical pathway (Tool 3A).
- Once you have the ideas grouped, work to clarify each opportunity statement as needed. If someone new to your organization read the list, would he or she understand the opportunity? Remove any duplicates from the list.
- List and review each opportunity with your team.
- Prioritize which items are most important to work on. Decide on a method to use for prioritization. Below are some examples.
Method 1: Multi-Voting
Multi-voting is a structured series of votes in order to narrow down your options. It involves having each person choose one-third (or other fraction) of the items.
This voting can be done in a number of ways. Think about the option that might work best for the people involved in multi-voting. In some organizations, people with more power might share their votes publicly, which could sway others’ opinions. Here are some options:
- People submit their votes privately to the person who will tally the votes.
- People share their votes publicly with the group and with the person who will tally the votes.
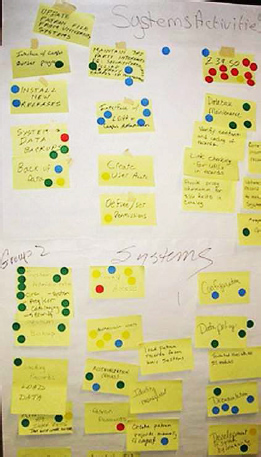
- People mark their choices from a list of items displayed on wall charts with an “X” or colored dot (Figure B-1). This option displays results instantly. Tell people they can use all their votes for one item if that is their preference.
Once the votes are in, tally the votes.
- Eliminate items with few votes.
- If a decision is clear, stop here. Otherwise, repeat the multi-voting process with the remaining items as needed.
Figure B-1. Wall Chart Displaying Votes

Method 2: Prioritization Matrix
Develop a prioritization matrix. List the opportunities in rows down the left side and your identified criteria across the columns.
Criteria (ideally developed by your group) might include the following:
- Resources (Are needed resources readily available?)
- Continuity (Does this support organizational goals and priorities?)
- Cost (How much cost does your organization incur each time this issue occurs or fails to occur?)
- Feasibility (Is the opportunity actionable/feasible? Are there ways to address this issue? Is there room to make meaningful improvement?)
- Integration (Is there an opportunity to build on existing work? Would this be a duplication of efforts?)
- Potential impact (Is there reason to believe that the opportunity will have a significant impact on your populations?)
- Readiness (Is there momentum to help move the issue forward? Will it be seen as important?)
- Responsiveness (Does this address a need expressed by patients, family, or staff?)
- Risk (How much of a risk does this issue pose to the well-being of patients?)
- Urgency (How soon does this issue need to be addressed?)
Decide on and define a rating scale for your criteria—typically 1 through 5 or 1 through 10. You can decide to weigh certain criteria more than others. Rate the opportunities as a group. Alternatively, have each group member rate the opportunities individually, and then discuss them as a group. The rating will be subjective and is meant to be used as a guide to stimulate discussion.
Once the matrix is completed, scores can be totaled for each opportunity. Discussion is needed to make final selections. The selections don’t need to be the items with the highest rating, although higher scores often indicate higher priority.
Method 3: PICK Chart
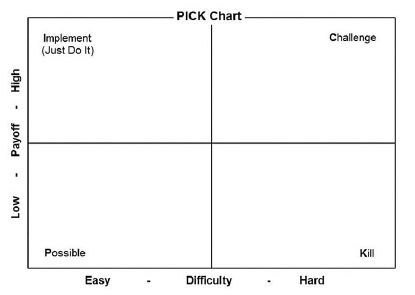
 A PICK chart is a Lean Six Sigma tool used to categorize and prioritize improvement ideas. It’s sometimes called an effort/impact chart. The chart has four quadrants:
- Possible idea.
- Implement idea.
- Challenge idea.
- Kill idea.
An easy way to create a PICK chart is to draw a 2 x 2 grid either on a whiteboard or a large paper flip chart. Have participants place improvement ideas (written on sticky notes) in the quadrant where they feel the idea best fits.
A PICK chart can be a helpful tool for deciding what to work on first. The ideas in the “implement” quadrant are likely a good place to start. The team can then start looking at some of the ideas in the “challenge” quadrant that are more difficult but have a high payoff. The ideas in the “possible” quadrant are not a priority to pursue, and the ideas in the “kill” quadrant should likely not be considered.
Here are some guidelines for using a PICK chart:
- Don’t let participants put their sticky notes between quadrants. They need to decide what quadrant they go in. The beauty of sticky notes is that they can always be moved as the team discusses each idea.
- Keep the PICK chart simple. Don’t subdivide each quadrant or allow participants to be strategic about the quadrant they place their sticky note in.
- If participants have trouble putting an idea in the quadrant labeled “kill,” explain that “kill” just means that the idea is hard to do and has a low payoff.


